Introduction
Dragging objects around until they look about right works for a while, but sooner or later something ends up floating a little above the floor or sinking into a table. Snapping fixes that. It lets Blender line things up for you: corner to corner, flat on a surface, or right on another object’s origin.
In this tutorial I’ll show you how snapping works in Blender 5.3, which came out on November 10, 2026, including the new Snap to Origin option. To show it I’m using a few free assets from the site: the Wooden Crate, the Antique Nightstand, the Ancient Clay Vase and the Apple.
1. Turn Snapping On
Snapping is in the header of the 3D Viewport. Click on the magnet icon (1) to turn it on, or press Shift+Tab. When the magnet is blue, everything you move snaps.
You don’t have to leave it on all the time. Hold Ctrl while you move something and snapping works just for that move. If the magnet is already on, Ctrl does the opposite and lets you move freely.
The small arrow next to the magnet (2) opens the Snapping panel, where you choose how snapping behaves. You can also open it with Shift+Ctrl+Tab while your mouse is over the viewport.
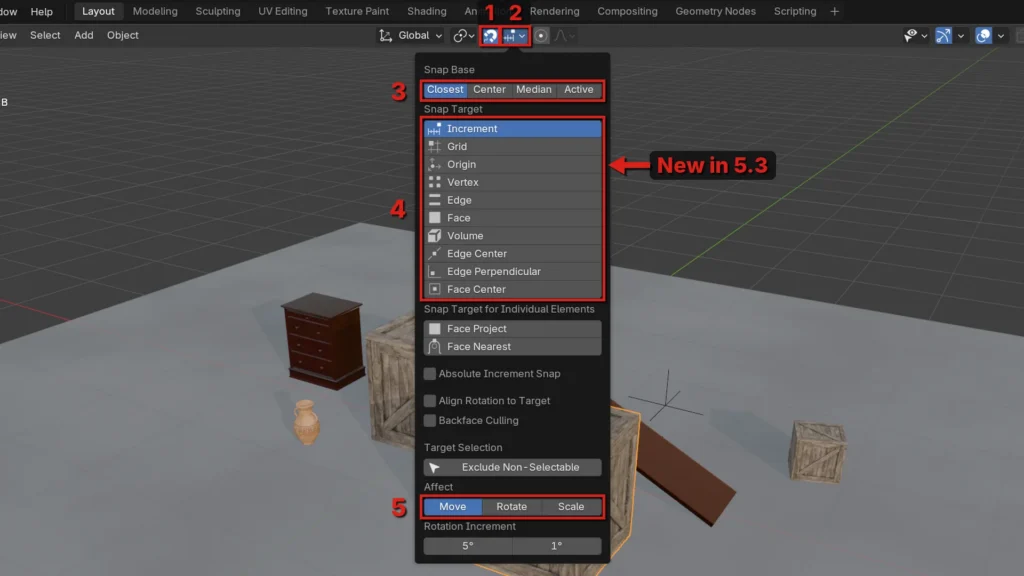
These are the three parts you’ll use the most:
- Snap Base (3): the point of your selection that snaps.
- Snap Target (4): what it snaps to. Origin is the new option in 5.3.
- Affect (5): which transforms use snapping. By default, only Move does.
If you’re following an older tutorial, Snap Base used to be called Snap With and Snap Target used to be Snap To. Same settings, new names.
2. Choose What to Snap To
Snap Target decides what your selection jumps to. Here’s what each option does:
- Increment: moves in steps the size of the grid, counted from where the object started.
- Grid: snaps to the grid you see in the viewport.
- Origin: snaps to the origin of other objects. New in 5.3, more on it below.
- Vertex: snaps to the vertex closest to your mouse.
- Edge: snaps to the edge closest to your mouse.
- Face: snaps to the surface under your mouse.
- Volume: snaps to the middle of an object’s thickness, which is handy for placing a bone inside a character’s arm.
- Edge Center: snaps to the middle of an edge.
- Edge Perpendicular: snaps to the point on an edge that makes a right angle with your move.
- Face Center: snaps to the middle of a face.
Shift+click to turn on more than one target. The header then shows Mix instead of a single icon.
One thing that trips people up: Increment doesn’t snap to the grid lines. It moves in grid-sized steps from the object’s starting point, so an object that starts at 0.3 m goes to 1.3 m, 2.3 m and so on. Pick Grid if you want it to land on the grid itself, or turn on Absolute Increment Snap.
3. Snap to Vertex: Stack One Crate on Another
Let’s stack two crates so their corners line up:
- In the Snapping panel, set Snap Target to Vertex.
- Select the crate you want to move and press G.
- Press B, hover over the bottom corner of that crate and click. This sets that corner as the snap base.
- Move your mouse to the top corner of the other crate. The crate jumps into place. Click to confirm.
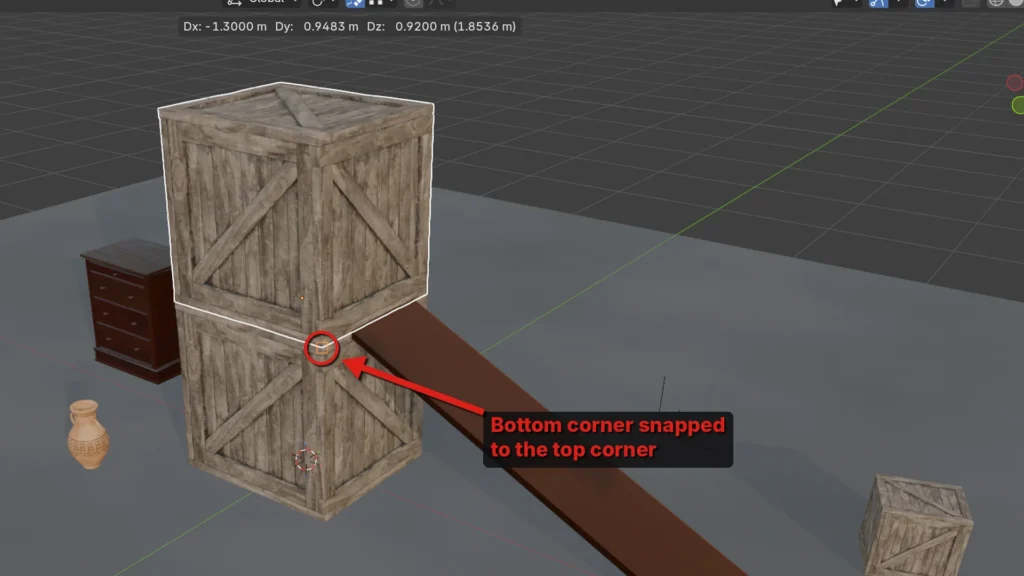
Why press B? With Snap Base set to Closest, Blender uses whichever corner of your selection is nearest to the target. When I tried it without B, Blender grabbed the top corner of the crate, and the two crates ended up side by side and overlapping instead of stacked. B lets you pick the exact point that snaps.
4. Pick the Point That Snaps (Snap Base)
Snap Base decides which part of your selection lands on the target:
- Closest: the corner of the bounding box (Object Mode) or the vertex (Edit Mode) nearest to the target.
- Center: the pivot point. Set the pivot to the 3D Cursor and you can snap from any spot you want.
- Median: the average position of everything you selected.
- Active: the origin of the active object (Object Mode) or the center of the active element (Edit Mode).
Active is the one I use most for props, because most assets have their origin at the bottom. Here I set Snap Base to Active and Snap Target to Face Center, selected the vase, pressed G and moved my mouse near the middle of the nightstand top. The vase lands in the exact center, sitting right on the surface.
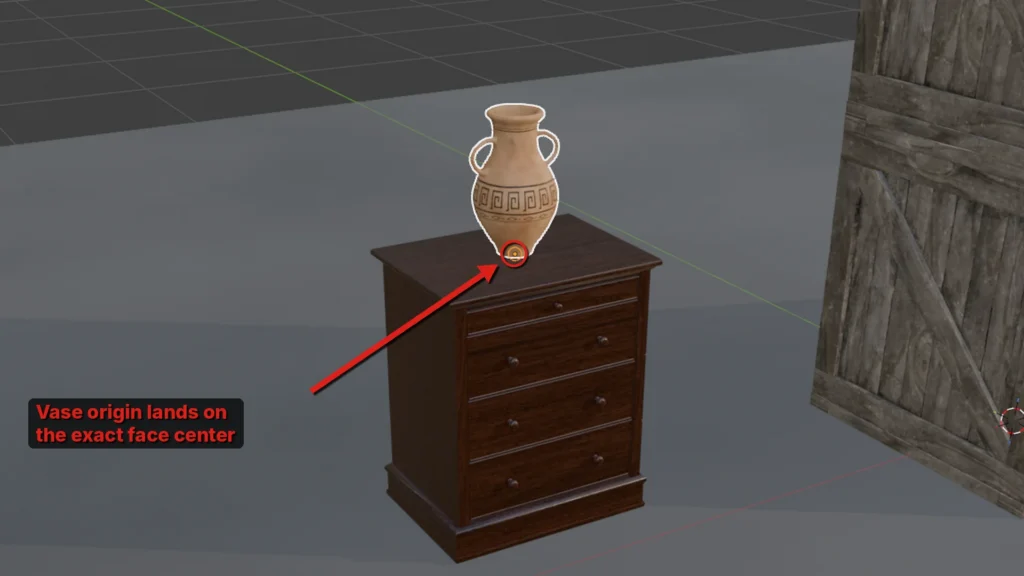
Face Center only kicks in when your mouse is close to the center of the face. If you hover near an edge, nothing happens, so move toward the middle.
You can also press A while moving to mark more than one snap point. Blender then snaps to their average position, which is a quick way to center something between two corners.
5. New in Blender 5.3: Snap to Origin
Blender 5.3 adds Origin to the Snap Target list (release notes). It snaps your selection to the origin of any object in the scene, the small dot that marks where the object is.
Before this, putting one object exactly on another object’s origin meant a detour through the Shift+S menu (Selection to Active, or Cursor to Selected followed by Selection to Cursor). Now you can do it while you drag.
A good use for it is swapping placeholders. If you block out a scene with simple boxes first, you can drop the real asset right onto each placeholder:
- Set Snap Target to Origin and Snap Base to Active.
- Select the crate and press G.
- Hover over the placeholder’s origin. The crate snaps onto it.
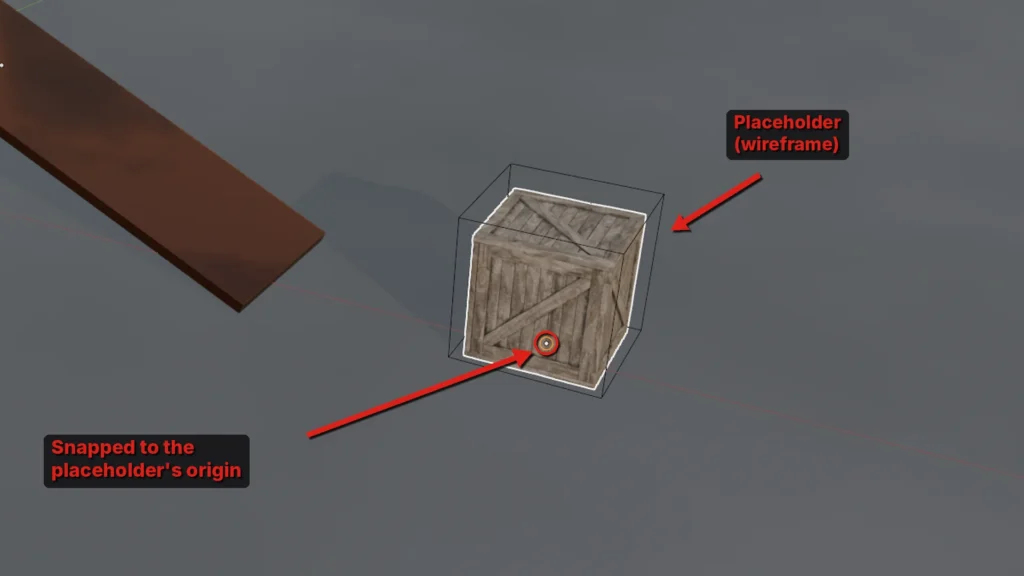
Blender only shows the origin of selected objects, so turn on Overlays > Origins (All) to see every origin while you work.
It also works in Edit Mode, including the object’s own origin. Select a vertex, press G and hover over the origin, and the vertex lands right on it.
6. Place Objects on a Surface
Face snapping drops your selection onto whatever surface is under your mouse, and Align Rotation to Target tilts it to match. It’s great for props on slopes, rocks on terrain or signs on a wall.
- Set Snap Target to Face and Snap Base to Active.
- Turn on Align Rotation to Target.
- Select the object, press G and move it over the surface.
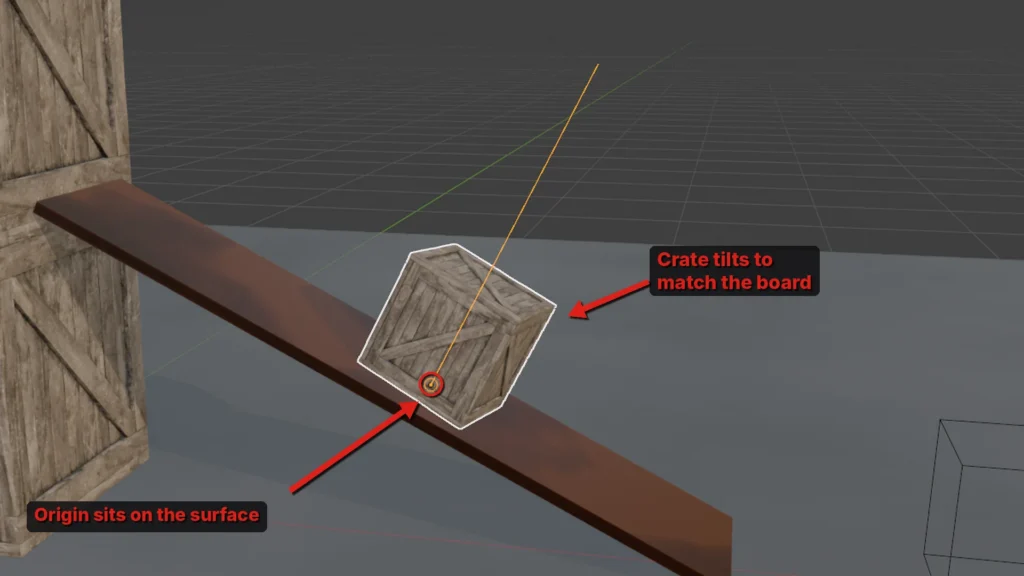
The small crate sits flat on the board and leans with it. The orange line shows the surface direction (its normal), and that’s where the crate’s Z axis ends up pointing.
This only looks right when the object’s origin is at its base. If the origin is in the middle, the object sinks halfway into the surface. There’s a fix for that in Common Issues below.
To snap many objects or vertices at once, use Snap Target for Individual Elements instead. Face Project snaps each object (or vertex in Edit Mode) to the surface separately, so you can bend a flat sheet over a curved shape. Face Nearest snaps each one to the closest face, even if it’s hidden behind something, a bit like the Shrinkwrap modifier.
7. Snap Rotation and Scale
By default, snapping only affects moving. Rotation doesn’t snap even with the magnet on. You have two options:
- Hold Ctrl while rotating. The rotation jumps in 5° steps, which is the Rotation Increment at the bottom of the Snapping panel.
- Turn on Rotate (and Scale, if you want) under Affect. With the magnet on, rotation then snaps every time.
The second Rotation Increment value, 1° by default, is the finer step Blender uses when you also hold Shift.
8. Use the Shift+S Snap Menu
Not all snapping happens while you drag. Press Shift+S in the viewport to open the Snap menu, which moves your selection or the 3D cursor to an exact spot with one click.
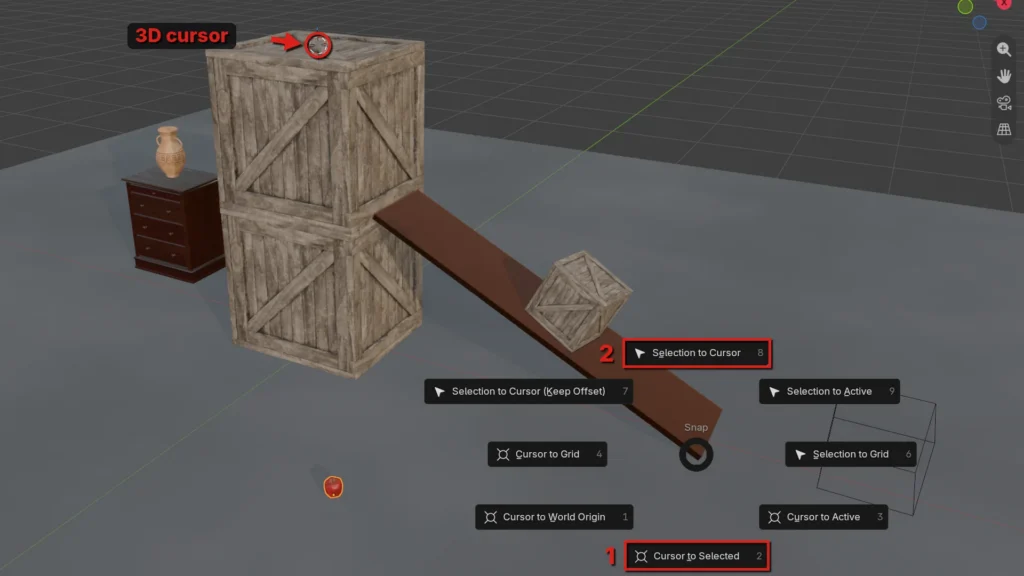
The two options you’ll use most work as a pair. Here’s how I put the apple on top of the crates:
- Select the top crate, press Tab and click a face in the middle of its top. Press Shift+S and choose Cursor to Selected (1). The 3D cursor moves there.
- Press Tab again, select the apple, press Shift+S and choose Selection to Cursor (2). The apple jumps to the cursor.
The rest of the menu:
- Selection to Cursor (Keep Offset): moves several objects to the cursor but keeps the spacing between them.
- Selection to Active: moves the selection to the origin of the active object.
- Selection to Grid: moves the selection to the nearest grid point.
- Cursor to World Origin: puts the 3D cursor back at the center of the scene.
- Cursor to Grid and Cursor to Active: move the cursor to the nearest grid point or to the active object’s origin.
Common Issues
“Snapping isn’t working”
Check that the magnet is blue (or that you’re holding Ctrl) and that the right Snap Target is selected. If only Increment is on, the object moves in steps instead of jumping to geometry. Rotation and scale only snap when you turn them on under Affect or hold Ctrl.
“My object snaps by the wrong corner”
Snap Base Closest picks the corner nearest to the target. Press B while moving to choose the point yourself, or switch Snap Base to Active to use the object’s origin.
“My object sinks into the surface”
Its origin is in the middle. Press Tab, select the bottom face, press Shift+S > Cursor to Selected, then go back to Object Mode and use Object > Set Origin > Origin to 3D Cursor.
“It snaps to faces behind my object”
Turn on Backface Culling in the Snapping panel so faces pointing away from you are ignored. You can also turn on Exclude Non-Selectable and make objects you don’t want to snap to unselectable in the Outliner.
“Face Center or Origin won’t snap”
Both snap to a single point, so your mouse has to be close to it. Hover near the middle of the face, or right over the origin dot.
💬 Final Thoughts
Once you get used to snapping, you stop nudging things by eye. Vertex snapping with the B key covers most everyday jobs, Face with Align Rotation takes care of placing props, and the new Snap to Origin in 5.3 replaces the old Shift+S two-step when you want one object exactly where another one is.
All the assets in this tutorial are free to download: the Wooden Crate, the Antique Nightstand, the Ancient Clay Vase and the Apple.