Introduction
The Color Ramp is one of the most useful nodes in Blender, but its colors and stop positions live inside the node. You can’t connect anything to them, and when the ramp sits inside a node group you have to open the group every time you want to change a color.
The free Color Ramp Converter add-on rebuilds a Color Ramp as a node group with one click. Every stop becomes a Position and a Color input, so you can edit them right on the node, connect other nodes to them, or show them on your own node groups. In this tutorial I’ll show you how to install it and use its features.
Prefer to watch? There’s also a video version of this tutorial on YouTube. It was recorded with the first version of the add-on in Blender 4.5, so a few options look different.
1. Download and Install the Add-on
Download the add-on for free from the Color Ramp Converter download page. You’ll get a file called color_ramp_converter_v1.2.0.zip. Don’t unzip it.
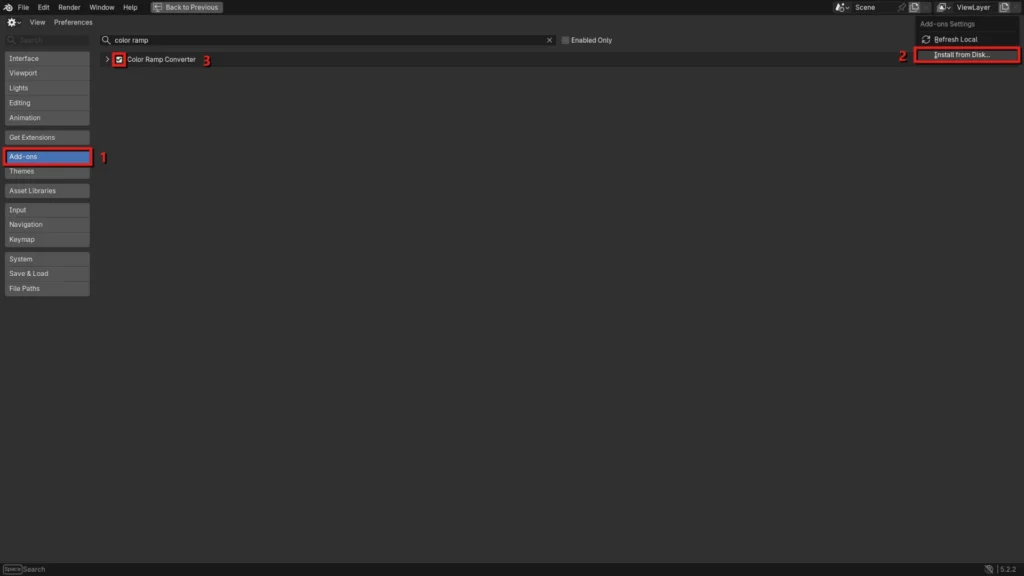
In Blender, go to Edit > Preferences and open Add-ons (1). Click the small arrow at the top right, choose Install from Disk… (2) and select the zip file. Make sure the checkbox next to Color Ramp Converter is on (3).
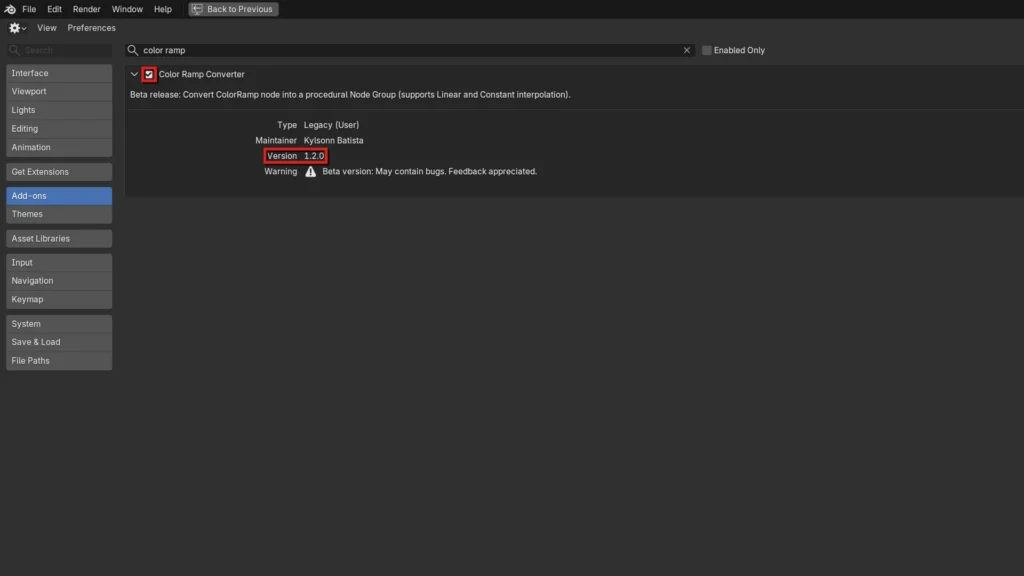
Click the arrow next to the name to see the details. The version should read 1.2.0. The warning icon only means the add-on is still in beta.
2. Open the Converter Panel
Open the Shader Editor and click the Color Ramp node you want to convert, so it’s the active node (1). Press N to open the sidebar and select the Converter tab (2).
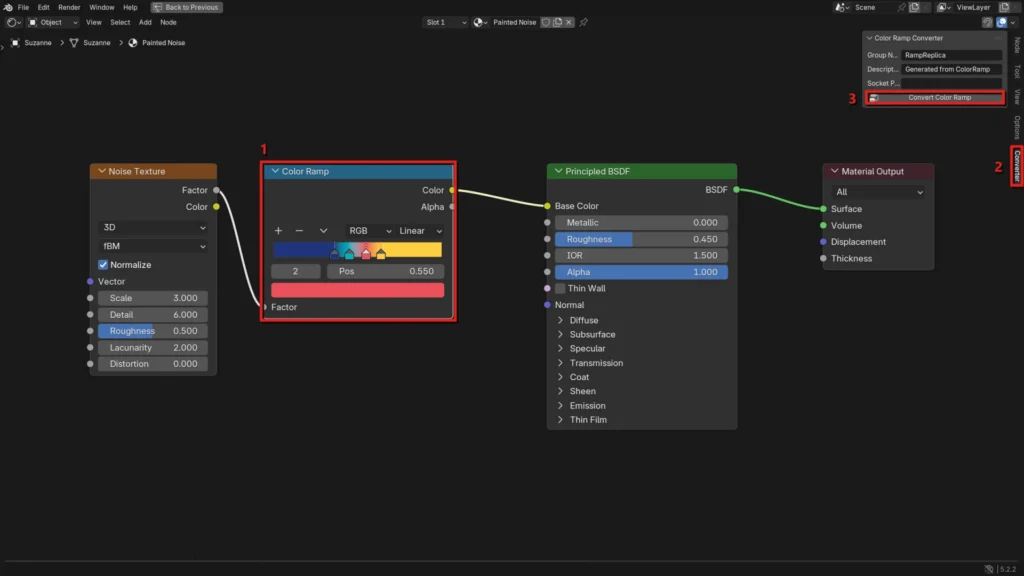
The panel has three optional fields:
- Group Name: the name of the new node group, RampReplica by default.
- Description: the tooltip text saved on the node group.
- Socket Prefix: text added in front of every input name, for example Rust Pos 0 and Rust Color 0. It’s handy when one material has several converted ramps.
3. Convert the Color Ramp
Click Convert Color Ramp (3). The add-on creates a new node group below the ramp, connects the same input to its Fac socket and sends its Result to wherever the ramp was connected. The material looks exactly the same as before.
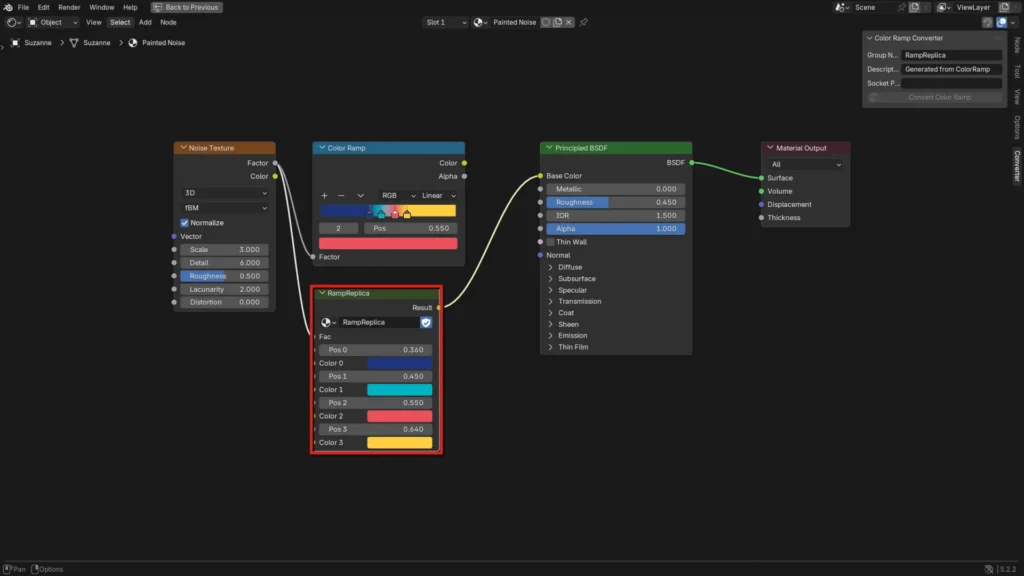
Every stop is now an input: Pos 0 and Color 0 for the first stop, Pos 1 and Color 1 for the second, and so on. The original Color Ramp stays in the tree, unplugged, so you can compare the two and delete it when you’re happy.
4. Edit the Colors on the Node
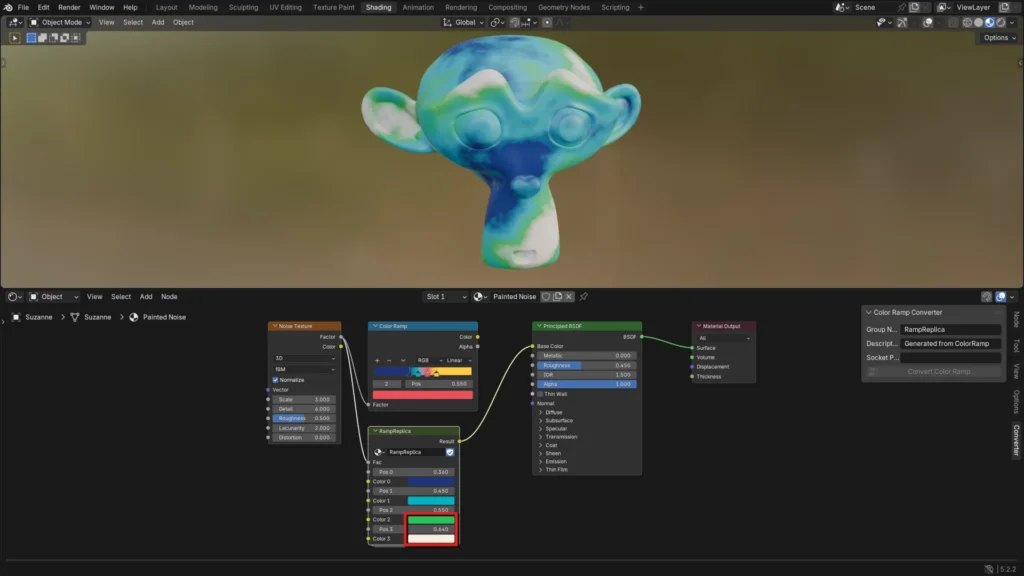
Now you can change the colors and positions directly on the node group. Here I changed Color 2 to green and Color 3 to a light cream, and the material updated in the viewport right away. Because they’re normal inputs, you can also connect other nodes to them.
5. See How It Works
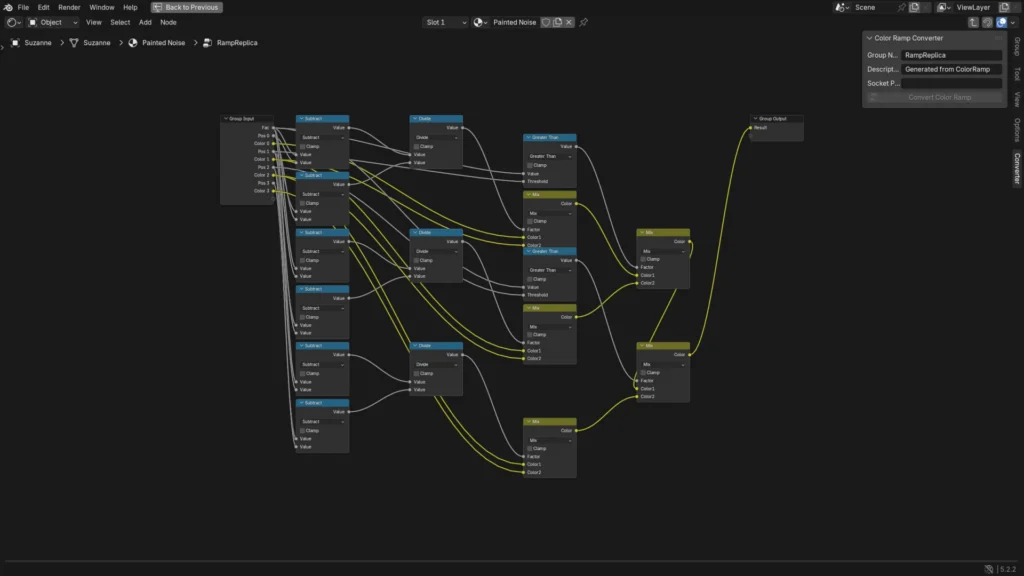
Select the node group and press Tab to look inside. The add-on rebuilds the ramp with Subtract, Divide, Greater Than and Mix nodes, one section for each pair of stops. You don’t need to change anything here. Press Tab again to go back.
6. Show the Colors on Your Own Node Group
This is where the add-on helps the most. If your Color Ramp is inside a node group, like the Noise Colors group in this material, you normally have to open the group every time you want to change a color. To control it from the outside:
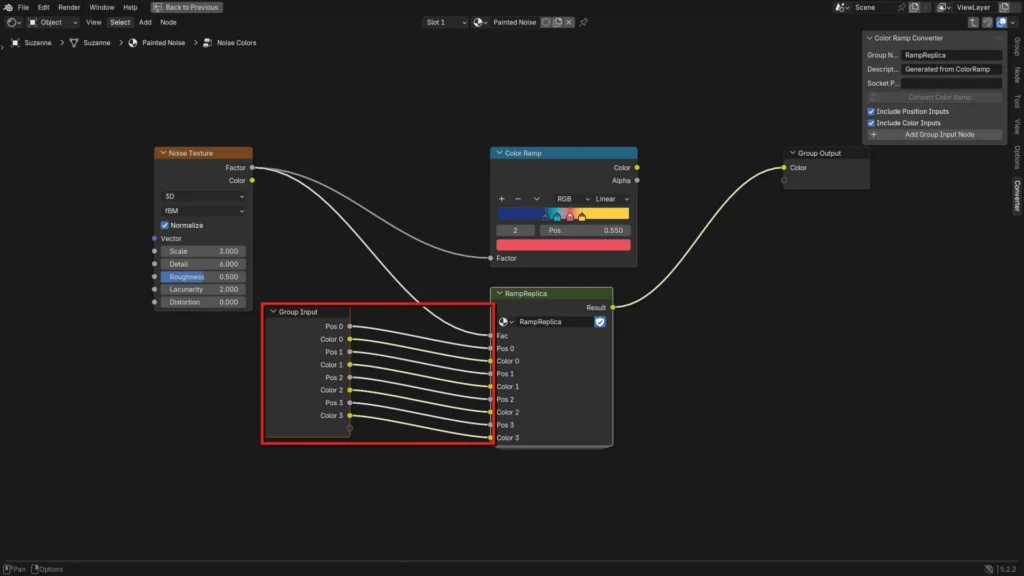
- Select your node group and press Tab to go inside it (1).
- Convert the Color Ramp as in step 3 and keep the new node group selected (2). If the group already has a Group Input node, click it first and then Shift + click the converted node, so the converted node is the active one. The add-on will use that Group Input node instead of adding a new one.
- In the Converter panel, choose what to add with Include Position Inputs and Include Color Inputs, then click Add Group Input Node (3).
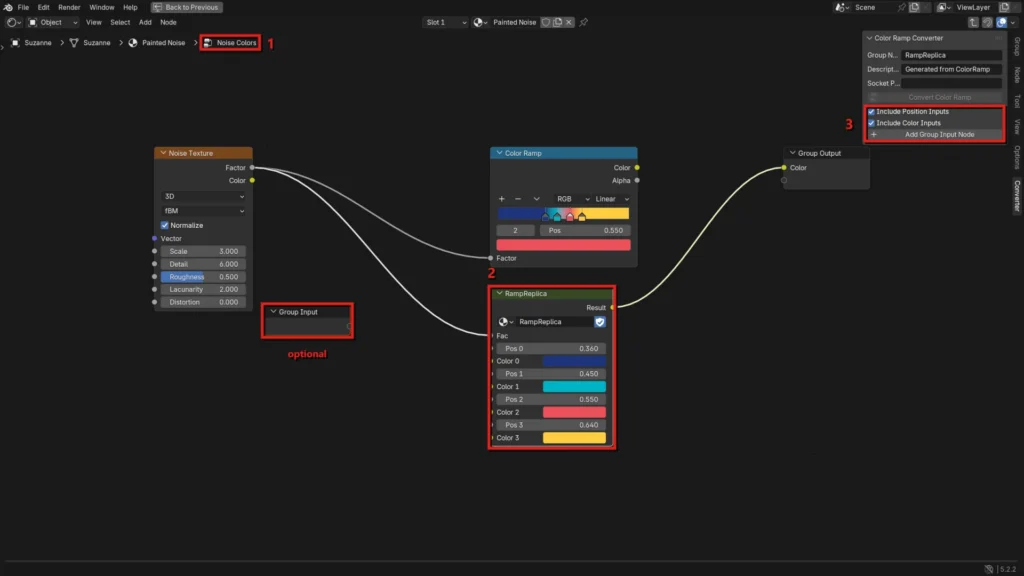
The add-on adds the matching inputs to your node group and connects them to the converted ramp. Position inputs are added as 0 to 1 sliders.
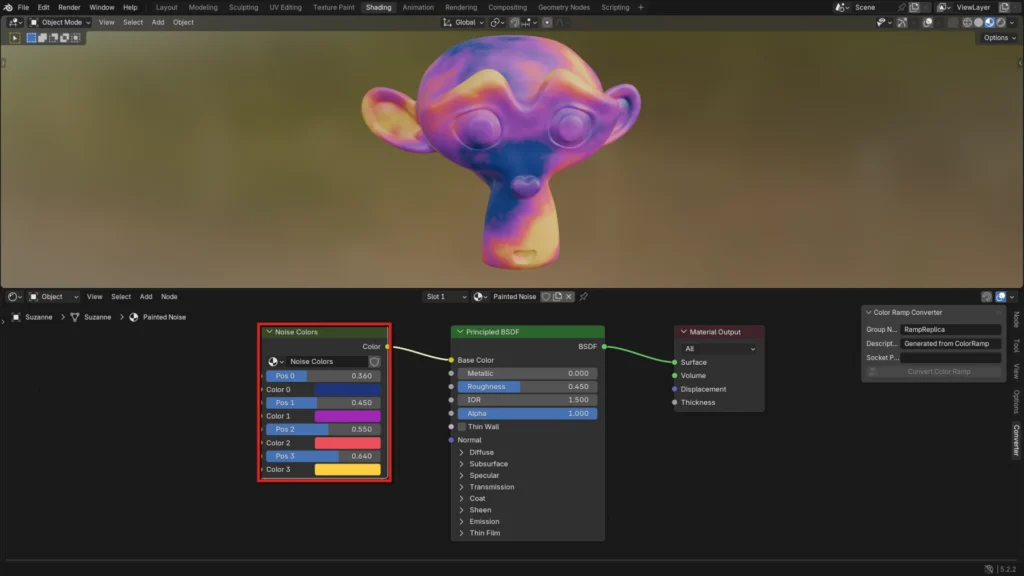
Press Tab to leave the group. Your node group now shows every stop as an input, already set to the ramp’s current values. Here I changed Color 1 to purple without opening the group.
Common Issues
“The Convert Color Ramp button is greyed out”
Click the Color Ramp node so it’s the active node. The add-on supports Linear and Constant interpolation only, so ramps set to Ease, Cardinal or B-Spline can’t be converted.
“I can’t see the Add Group Input Node button”
It only appears when you’re inside a node group (select the group and press Tab first) and the active node is a node group, such as the one you just converted. At least one of the two Include checkboxes has to be on.
“The colors look slightly different after converting”
The converted group blends colors in RGB. If your Color Ramp uses the HSV or HSL color mode, the transitions between stops will look a bit different. Only the Color output is rebuilt, not Alpha.
“My file is full of RampReplica node groups”
Each conversion creates a new node group with a fake user, so it stays in the file even after you delete the node. In the Outliner, switch the display mode to Blender File, open Node Groups and delete the ones you don’t need.
💬 Final Thoughts
A Color Ramp you can’t reach from outside its node group is one of those small things that slows down material work. Converting it takes one click, and from then on every color and position is a normal input you can change, connect or show on your own node groups.
The add-on is free and still in beta, so feedback is welcome. Download it from the Color Ramp Converter page.